decor ideas · DIY · tutorials

DIY Botanical Gallery Wall

PicMonkey Imagelogo

So excited to share with you this DIY today. I love a good gallery wall, and after hours of Pintrest inspiration search I decided to go with a Botanical theme to our gallery wall. As I shared earlier in my Living Room Refresh post, we live in a flat with no garden, so I tried to bring in as much greenery as possible in pots and frames too. 🙂

The frames are the ones I shared in a recent haul post , I got them from a charity shop. Recycle & Reuse! I went for a symmetrical clean look. I originally wanted to paint them black but I think the contrast  would have been to strong, so I went with a Graphite Gray Color. I used Rust-Oleum Chalky Finish Furniture Paint in Graphite. You can find it at The Range and B&Q.

DSC_0063

I had lots of help. 🙂

DSC_0065

I used A3 card to cut out the white border and printed the botanical prints on mate  coated picture paper, both from Wilko. You can download the botanical Prints for FREE here.


DSC_0100

DSC_0098

I love how they turned out! You can see some of the new things like the new sofa, rug and coffee table in the pictures too. 🙂 We still have a bit more to do. I keep moving stuff around until it feels just right. 🙂

Thank you for reading! xx

decor ideas · DIY · Uncategorized

Decor Haul – charity shops & TK Maxx


PicMonkey Imagecoll.jpg

Hello,

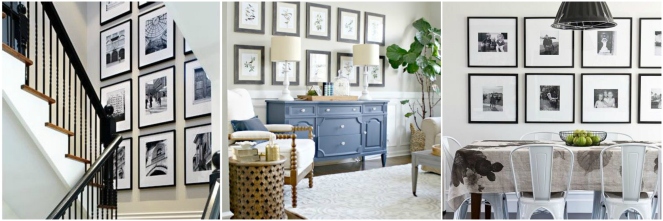
I am excited to share with you today a collective haul from different charity shops and my favorite shop of all times TK Maxx. 🙂  The one thing I am most excited about my charity shop finds, are eight picture frames (only four pictured) that I got for £24! I bought them for the good quality wood frames that I will spray paint black  and use them for a symmetrical black and white gallery wall. ( I will share on that on a different blog post)

Here is my inspiration for the gallery wall:

PicMonkey Collattrtvjge

Here are all the goodies I found over the last two weeks.

Also, those cotton branches were a quick DIY  I used to decorate for a ladies  western barn dance get together at church. There were really easy to make, I will do a cotton wreath and share the DIY, so watch out for that soon.

DSC_0021

The large frames were £4 each but because I got all eight of them, the lady gave me two for free! I love a good deal!

DSC_0027.JPG

DSC_0022

I found two books that I mainly got them for their color, thickness and interesting title ..:) I love to read, I promise, but it won’t hurt if the books on display look pretty and complement the rest of the decor, right? £2.50 each!

DSC_0023

This is now one of my favorite frames. I have a few in this style – Indian craftsmanship / hammered look, and I bought them from TK Maxx, this one was £1.50!

DSC_0028.JPG

DSC_0025

While at TK Maxx with my kids, we were admiring all the Autumn decor and there were these little acorns and pears ceramic boxes that we liked but ended up not buying. I am glad we didn’t. A few days later I found this gorgeous  pear shaped box. It has a lovely wight to it , I just love it! It was £ 1.50!!!

DSC_0029.JPG

I also found this tall Dragon Leaf Plant on a Selling Group on Facebook for £8!! I just need to find it a nice pot. Maybe a basket?

On to the TK Maxx  and Asda George finds:

DSC_0036

DSC_0035.JPG

The silver frame (that will turn into a gold frame by the power of a spray paint can) was £1.75 and the No 5 candle was in the clearance section dor £0.50! (5 because we are a family of Five! 🙂 .

The table runner and the blue round frame are both from TK Maxx. That table runner spoke to me! I love all the details! It was hand made in India. Love, love it! It was £9.99.  The frame was £4.99.

Lovely tassels!!

DSC_0041

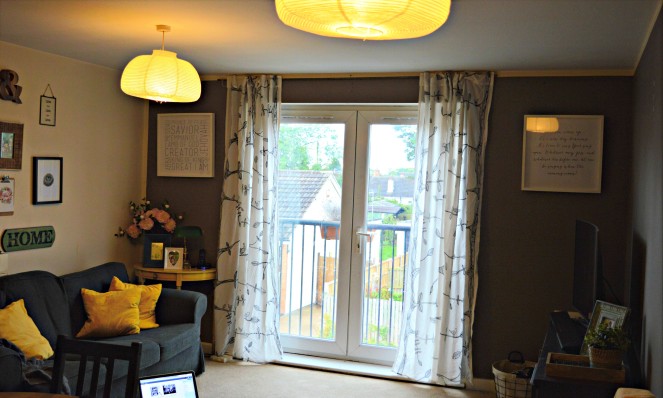
As you might have noticed, the colors I am going for, when it comes to accessories   are, blue, navy blue, burnt orange with gold accents . Other colors will be : dark grey, black and white. Now the style that I like, it can’t really be defined in one word. I like what Melissa Michaels says in one of her books, Simple Decorating :

” You will define your style by living it first. Your life experiences and personal preferences should inspire the look and feel of your home. “

I am inspired by my faith, different cultures, history, nature, my kids, traveling.  It could be called, eclectic style or global decor with a bit of clean lines and structure ..I think it’s important to balance it or it might be perceived as messy and unorganized.

So far I am really enjoying the process !

Thank you for reading! Talk to you soon! God bless you and your family!


decor ideas · DIY · Uncategorized

Living room refresh

Hello, I know I know, it’s been a while. I feel like every time I write a new blog post I have to explain my absence on here…and you know, life gets in the way 🙂 .It’s the Summer Holiday, the kids are off school and I thought what better time to redecorate the living room… because we need more crazy around here.

Let me give you a backstory. We rented this flat (apartment) for the last 6 YEARS! It was supposed to be just a short, one year, stop on our way to renting (hopefully buying ) a house. God had a different plan for us and fast forward 6 years later we are still here and we will still be here for the next 3 years at least, until I finish my degree. It is a very good size two bedroom apartment, two bathrooms, open-space living room and kitchen.  All three kids share a room. It’s big enough to fit three separate beds ( no bunk beds…I don’t really like them, don’t know why) and everything else. I will probably share how we make it work in a room tour blog post in the future.

So as we recently decided that we will not going to be looking for a house for the next three years, I really wanted a refresh of our home. We were always thinking we might move in a few months and so all the things I dreamed about when I envisioned my home to be and feel where always for the future, pined on my Home Pinterest Board. Living in a rented place I am limited with what I can do, but I decided to take that as a challenge and see how I can have the things I love, like the window seat  for example, work for the space I have. We don’t have a huge budget, I am a full time student with three kids on one income ( God bless my sweet husband).  I do have a part time business as an event stylist but it’s not a steady monthly income so there will be a lot of IKEA, charity shops and DIYs.  But I am so excited to share the whole process with you. We are going to start with our living room/ family room/ dinning room…it serves a lot of purposes to our family of five. It’s an open space kitchen and living room so it’s the heart of the home, it’s where we spend most of our time as a family, where we entertain and were our guests sleep.

Today I will share some of my inspiration for the open-space living room with you and how I plan to make it work for our space.

The inspiration:

two

And this is the space we are working with, this is how the living room looks now:


DSC_0018copy

I love the idea of a window seat with tall bookshelves on either side. A place where my kids can snuggle with a book or day dream looking out the window. So I am thinking Ikea Billy bookshelves on each side of the window with doors on the bottom for more hidden storage and a Kallax unit as window bench. Something like this.

b4c54434d291e7f107a698d72d5521d0

The window is actually a double door Juliet balcony and the only natural light source for the whole room- living room and kitchen, so I need them to still open. So I am thinking to add castor wheels to move it around. Also there’s a low window sill that I have to work around it, I don’t really have a solution about that yet, any suggestions are more then needed.

We are also replacing the sofa for a sofa bed,  the TV stand for a chest of drawers  and the kitchen/ dining table. What I want from this space is more storage = less clutter, more seating areas, more light, and for the whole place to feel more grounded, I am thinking of an area rug too. We will love to replace the carpet flooring with hardwood flooring but that’s a no go in a rental.

The Ikea delivery is supposed to be here in 10 days!! We have to refresh the wall paint by then. I will love to replace the  magnolia color we have now with a bright white but our kitchen units are a glossy magnolia color and I am afraid it might clash and make them look like they’re  dirty…the same with the white bookcase on one of the walls, so the jury is still out on that one.

Can’t wait to share some Ikea hacks and DIY projects from this whole process with you all and of course the big reveal.

Thank you for reading!


cropped-pinkwatercolor11.jpg


decor ideas · DIY

DIY EASTER MOSS WREATH

Spring is here!! yay!! You have no idea how excited I am for warm weather!
 As soon as  Christmas is done 😦 ,  I am ready for some sunny skies, fresh spring flowers and Easter!
 
In our family, Easter is all about Jesus!
 Sure, bunnies and baby chicks are cute but the reason for the holiday is what our Lord Jesus did on the cross and that he is risen !
So to celebrate that, I am sharing with you how to make your own festive Easter Moss Wreath.
I was considering adding some bunting to it but I kind of  like the simplicity of it…just the moss and the twiggy cross. Sometimes simple is better.


 Here is what you need:
 
-2  flexible foam pipe insulation (you can find them at any DIY- Wilko or B&Q)
-dry moss – you can use artificial moss too you can find them at your local florist or Amazon.
-sellotape
-black tape
-green thread to match your moss
-green spray paint –
I spray painted the wreath green first, just so that if any of the base colour  was showing through, it wont be noticeable, but I could have skipped this step. The moss covered everything really nice and didn’t ripped that much ( I used this moss many times before for party decor and it held up really well).
-some fresh spring twigs for your cross.


Use your pipe insulation to make two circles.
 For the first one I used the exact length that it came in 100 cm and 15 mm thick.
 For the small one I just cut it to fit . Use tape to stick the ends together.

To be sure they won’t pop open I went a bit cray cray with the tape and cover the whole thing.

Yes… there is a green spray paint circle mark  now on my driveway…I should have used a piece of cardboard or something..oh well…we get plenty of rain…it will wash off…eventually.

  Now the messy fun part.
The moss that I used came in one big piece, so I just started to cover my wreath and secure it with green twine by wrapping it around it as I went. I didn’t really bothered to cover the back completely, just made sure the front was nice and tidy.
 I used a dot of hot glue for the twigs and then wrapped some string over the base of the cross.
And you are done!
I had the perfect spot for it! Thinking of making one for my front door! Love it so much I’m keeping it up until Christmas!


Love this little detail. You can see new life  blooming!


       If this tutorial was helpful please share it!
Again, thank you for reading!
Happy Spring!
crafts · DIY · Fathers Day · kids stuff · Party

Unique Fathers Day Ideas. Celebrate.+ Free Printables

Fathers day sneak up on my this year. I usually plan ahead of time any crafts that I might do with my girls or DIY gift ideas…oh well , it is all good.
I have a secret (well is not THAT secret) weapon. It’s called Etsy ( I know you thought of Pinterest, but I was a bit disappointed …the same stuff every year.)
 Click here for last year inspiration post , or if you are planning on a nice breakfast for Fathers day I have some ymmy recipes right here.
 
Would you like to see what cool ideas I found?, by the way you can totally do a DIY project inspired from these.
 
This is by far the coolest thing ever! I would love to get it for my husband! He used to be a sound technician…kind of, in our local church back home and he is into sound system..and..stuff…I have no idea what I’m talking about here, but I know he would love this one! 

It is the perfect gift for Father’s Day -they take your voice, in all its intricate detail, and turn it into a striking piece of art for your wall.
Get the kids around to say ‘We Love You Daddy’ (in unison. He can then treasure their tiny voices forever, both as an image and a recording.
You can even send them a recording of your baby’s heart beat – this would look gorgeous on a nursery wall. Get it here.

Personalized Hammer . You can engrave a favourite bible verse, your kids names or a thank you note .This would be great for a granddad as well, and it would last for generations too! Love it.
Get it here.


Now, this one is so cute! And perfect if you have a son in your family. Love the moustaches!
Get it here. 

…and for your little daughter this is so sweet!
She can wear the necklace and daddy the keychain.
                                            Get it here.
 

Father’s Day Printable Typography Glasses -FREE Printable! Click here to get the step by step instructions.

Click on the image , it will open in a new window and you can print it from there.
Get your kids to colour it and you can even frame it if you wish.


           I hope you have a blessed time on this Sunday and enjoy and celebrate your Fathers Day!

DIY · things you should know

My 10 favourite blogs! You will love them all!

Hey it’s  Friday!
Do you know what my favourite thing to do is on Friday ( night) ,on a good Friday, one where I don’t fall asleep  at 8 PM putting baby Hannah to sleep ?
 
I like to make a cup of tea and catch up on my favourite blogs.
 I’m telling you , it’s like reading a good book. I feel inspired and ready for the weekend.

 I’m going to share with you today some of my favourite bloggers. You are going to fall in love with them , all of them, just like I did. You are welcome! 🙂


Photobucket


Happy Reading!
 
Â